In this article I will review the best front and rear dash cam under $200.
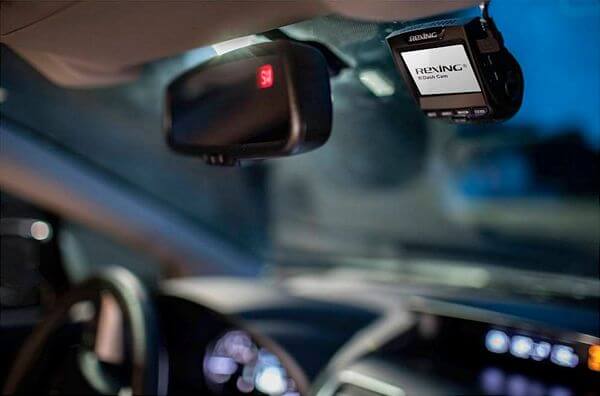
Recently I installed a Rexing V1P 3rd-generation dual dash cam on my car and now that I’ve gotten to use it a bit I want to share my review with you.

First thing I’ll mention is that I got the dual version, which means that I opted for both front and rear facing camera.
I also got the hard wiring kit because I didn’t want to have to plug in the power cable to the car’s 12 volt socket.
Table of Contents
Main Features

- full HD dual channel
- 1080p (1920×1080) video at 30 frames per second
- ultra wide angle to record 170 degrees to the front and the rear
- loop recording
- accident detection
- GPS compatibility
- Built-in Wi-Fi
- super capacitor instead of internal batteries
- temperature resistance, from -20°F to 176°F
Set Up

The USB cable that connects the rear-facing camera to the main camera body is long enough so that it reaches from the front of the car to the back and usually gets hidden in the car’s headliner.
The small USB cable will allow you to plug in the camera to your computer to view or copy files, if you don’t have a card reader.
There is also a cable that plugs into your car’s 12 volt socket. The camera uses a standard mini USB connector for power. The cable is long enough for you to route through your headliner and trim for a semi-permanent install if you want. But if you are like me and you buy a hard wiring kit, then this cable is a good secondary cable to use in a different car or when using the camera in a different location.
If you decide to get a hard wiring kit, it has a built-in fuse and it’s long enough to go from the fuse box to your dash cam location.
For hardware, you’ll get two camera mounts, which is great because you can use one on your primary dash cam location and use another in a different vehicle or spot.
You also get two strips of 3m tape, a few cable management clips and a small panel removal tool to aid in the installation.
Features Overview
Let’s talk about the camera and some of its functions.
On the left side is a plug for the rear facing camera and a plug for your GPS unit, which sells separately, but you can buy it and plug it in there and have full GPS capability from the camera.

On the right side you have a microSD slot and right next to it a reset button and your power.

On the back side you’ll see your camera, which you can actually move so you can adjust the camera.

On the front side are LCD screen and buttons.

You turn the camera on by pressing the power button. Once it’s on, it instantly starts recording, which is supposed to do.
On the top right of the screen you can see the current recording time and below it the resolution in the frames per second.

On the left of the screen it shows you it’s recording in a loop for three minutes. Right next to that you can see the red blinking dot, which tells you that the camera is recording.
Next to that you can see that the camera is in video mode. WDR means that the wide dynamic range is on. That’s gonna allow the camera to adapt to different light conditions. I really found no reason to leave that off, it looks bad when you leave it off.
Below that it shows you the exposure compensation settings. It also shows you your microphone, which means that you’re recording. When you press the mic button, you can turn that on and off.
Next to that you can see the date and the time.
You have OK or select button, record button that turns the recording on and off, mic button and your menu button.
A very useful thing about the camera is if you’re recording and you’re driving and you come across something that you want to remember, you could press the OK button just one time to lock the file. You will see the key icon on top of the screen.
That’s very useful because if you’re recording and you have a large capacity card inside the camera, and you’re recording for hours and hours, it could be hundreds and hundreds of files. So it could be very hard to find exactly what file it was that contains whatever it is that you wanted to record and remember.
When you do that, a particular file is placed in a folder, so it will not be overwritten by the camera and it’s very easy to find later.
Menu

When you go into menu, there are a couple of the things that you can do with it.
Very first thing is the resolution. If you just have the Rexing V1P 3rd-generation camera and not the dual configuration, then you can go all the way up to 4k so 2160p at 24 frames per second. You can go 1440p 30 frames per second and so on.
If you have both rear-facing and forward-facing, then the maximum that you can do is Full HD, which is 1080p at 30 frames per second, both the front and the rear.
Loop recording is gonna allow you to select between 1 minute and three minutes. Those are your only options.
When it comes to exposure compensation, the camera auto adjust its exposure, but if you find that for whatever reason, it’s too dark or too bright, then you can go ahead and use this exposure compensation to fix that. You can go all the way up to two stops in compensation so it’ll be much brighter than what the camera automatically exposes the video for.
You can do the same thing the other way and make it dark and underexposed by two stops. For most people, you’re just gonna set that to zero and leave it.
Record Audio setting turns the audio on and off.
The Date Stamp puts the date stamp on the bottom of the video.
Gravity sensing sets the sensitivity of the sensor inside the dash cam that detects a crash. In the event of a crash, the dash cam will actually take whatever videos recording at that time and put it in a separate folder so that it is not overwritten by the dash cam.
Plate Number allows you take your plate number and enter it and then add it to the videos.
There are some other basic settings that you can mess with but they are not really incredibly important, except seeing the version of the camera. That’s important because the very first thing you do when you buy this camera should definitely be checking version of the firmware on the website and if it’s not the latest firmware on the camera itself, you should update the firmware on the camera.
Main Description

By default the camera is on video mode. If you want to put it in photo mode, long press the menu button and that puts the camera in photo mode. This allows you to set all the settings as you would in a normal camera through the menus.
If you long press again, it’s gonna take you to the playback menu. You can scroll through all the files in your dash cam and you can actually review the file on the camera itself by just hitting the play button.
Rather than going through the menus, you can actually just turn on the Wi-Fi by long pressing the record button. The camera itself is going to generate a Wi-Fi network. You will see the name of the network and right below it is the password.
After you install the application on your phone, go to Wi-Fi settings on your phone and choose that network and connect. Now you can press on Recorder and it’s gonna show you what the camera is seeing.
There are a few things you can do from the app although it’s not loaded with unnecessary stuff. You can start and stop the recordings, you can go on the Videos and you can actually just scroll through videos and watch what you want. You could do the same thing for photos.
You can change almost all settings from the app on your phone. That’s pretty neat application. It does what it should do and it does it well without all the extra junk.

I have this dash cam installed in my car for several months now and overall I think the camera performs extremely good for its price point.
I like how the camera is not overly complicated and the things that it does it does well. It would be nice if it records a dual 4k but I recognize that that takes a lot of processing power, which would drive the price of the dash cam up. So I’m okay with that.
I do wish there were different compression options for us who might use the footage for other purposes.
The dash cam uses super capacitors, which means there’s no internal battery. They did this to increase the reliability of the camera in the extreme temperatures that it can see inside the car. The camera’s working temperature i -20F to 176F.
The capacitors provide enough power for the camera to finish saving the current recording and shut them properly but it still requires power to run. This also means that if you want to wire the camera to continuously record, even when you turn off your car, you have to install a battery discharge prevention device that can monitor your battery’s voltage and cut off power to the dash cam when it drops below a certain threshold.

The camera consumes very little power especially if the screen is off so it can record for hours before the voltage is cut off so that’s perfect to have continuous recording when your car is parked.
To record while your car is parked, the camera must be wired to a source that provides power even while the car engine is off. In some cars, a cigarette lighter port always provides power. Other cars require a hardwire kit to connect to an always-on fuse.
It’s important to buy a high-quality class 10 micro SD card or you’re bound to have issues. The job of a dash camera is very taxing on the SD card so this is critical. In my months of use, I haven’t had any issues with corrupted files or any random camera bugs.
The camera supports cards up to 256GB. You can get 7 hours of recordings to a 64GB micro SD card before it starts looping over the oldest unlocked files.
The rear camera is powered through its connection to the front camera unit. Video from the rear camera is saved to the same location on the memory card used in the front camera.
The important feature to me is image quality. It is first-class and I get no blurring, distortion or fluttering of the images. No lags, skips, pixilation, or missed time frames.

After several days I pulled the SD card and viewed the images on my laptop. Amazing quality! I could easily read license plates and bumper stickers. Colors were vivid even in low light conditions.
I can tell you from experience, if you need to submit the footage to law enforcement or the court, they want to be able to clearly read the plate numbers.
I find the quality of the video produce more than adequate especially at the price point of the dash cam. As with most cameras there’s considerable windshield glare because of the angle of the lens and the distance from the glass. I wish they’d offered polarized filters for it to combat that but the footage is still clear and more than usable.
As you can expect with any camera, the quality of the video diminishes as it gets darker outside and the camera is forced to up the ISO and lower the shutter speed.
Dashcams at this price point that advertise gimmicks like night modes are just trying to sell you snake oil.
The sound quality from the camera is adequate for most purposes. I mean you can hear noises from the outside if they’re loud enough for you to hear them.
The built-in screen is not of the highest resolution but adequate for occasional use and to glance at it and see the status of the camera.
There’s no way of knowing if the camera is recording without looking at it. It does have an audible indication that it’s on but not that it’s recording and that’s unfortunate because it would have been something very easy to design into it.
Maybe we’ll get it through a firmware upgrade.
![]()
![]()
Conclusion
In closing, I find this a very worthwhile investment and a necessity to protect yourself. I don’t think I’ve made many compromises with this particular model.
I don’t care that this camera doesn’t have GPS to record location and speed. I don’t need to have my car’s speed noted on the video, because video evidence could be detrimental if the GPS shows my speed higher than the posted limit.
Unfortunately because there’s no motion detection built-in, I will need a battery discharge prevention device to have continuous parking mode, which is far superior to motion detection because in the event of an issue you will have complete coverage of the incident.
This front and rear dash cam offers an amazing recording experience, is extremely easy to set up and install, comes with extra accessories, and is made from the highest quality materials.
The included instructions are easy to follow for set up and adjustments.
My camera has gotten both really hot and cold and still performs flawlessly.
Many people underestimate the value of a high quality dash cam, and they get the cheapest model. That is a huge mistake. These generic units often drop parts of recordings. Why is this so bad? Imagine being in an accident and you believe you have proof it’s not your fault, but the unit failed!
Other big problem with cheap dash cams is poor resolution. So, if someone clips your car and runs off, it is possible that you will not be able to read the license plate.
Going cheap sometimes can be very expensive!

Overall I recommend this product and honestly I don’t think I will be buying dashcams from anyone else.
If you want a reliable and advanced front and rear dashboard camera under $200, then the Rexing V1 3rd Generation is the best choice.
Click Here to Buy + Free Shipping!
